Python爬虫系列——爬虫基础

Python爬虫系列——数据请求

​ 爬虫是一种按照一定的规则,自动的抓取网页信息的程序或者脚本,这样的程序可以用很多语言实现,但是人生苦短大家都用python,所以你要有python基础知识(跟着我的博文走一遍就好啦)。

​ Python爬虫的方式有多种,从使用爬虫框架获取数据解析提取,再到数据存储,各阶段都有不同的手段和类库支持。虽然不能一概而论哪种方式一定更好,毕竟不同案例需求和不同应用场景会综合决定采取哪种方式,但对比之下还是会有很大差距。

Selenium

  • Selenium是一个用于Web应用程序测试的工具,但是处理一些小爬虫很方便

  • 关键命令

    1. find_element(s)_by_tag_name

    2. find_element(s)_by_css_selector

  • 案例说明——爬取商城商品信息

    1
    2
    3
    4
    5
    6
    7
    8
    9
    10
    11
    12
    13
    14
    15
    16
    17
    18
    19
    20
    21
    22
    23
    24
    25
    26
    from selenium import webdriver
    import time

    browser = webdriver.Chrome()
    browser.set_page_load_timeout(30)
    browser.get('http://www.17huo.com/search.html?sq=2&keyword=%E7%BE%8A%E6%AF%9B')
    page_info = browser.find_element_by_css_selector('body > div.wrap > div.pagem.product_list_pager > div')
    # print(page_info.text)
    pages = int((page_info.text.split(',')[0]).split(' ')[1])
    for page in range(pages):
    if page > 2:
    break
    url = 'http://www.17huo.com/?mod=search&sq=2&keyword=%E7%BE%8A%E6%AF%9B&page=' + str(page + 1)
    browser.get(url)
    browser.execute_script("window.scrollTo(0, document.body.scrollHeight);")# 屏幕滚动,不然会load不完整
    time.sleep(3)
    # body > div.wrap > div:nth-child(2) > div.p_main > ul
    goods = browser.find_element_by_css_selector('body > div.wrap > div:nth-child(2) > div.p_main > ul').find_elements_by_tag_name('li')
    print('%d页有%d件商品' % ((page + 1), len(goods)))
    for good in goods:
    try:
    title = good.find_element_by_css_selector('a:nth-child(1) > p:nth-child(2)').text
    price = good.find_element_by_css_selector('div > a > span').text
    print(title, price)
    except:
    print(good.text)
  • 如图,获取商品页面信息

  • 使用谷歌浏览器,在页面元素处右键检查可以查看页面代码,使用Copy selector得到定位信息传入方法,如图所示

    注:定位信息的获取只需观察HTML标签的所属关系即可发现规律

  • 使用webdriver接口需要安装驱动

    注:一般情况下需要将下载的驱动放在自定义目录下并加入系统环境变量,但我试了不行,于是放在谷歌浏览器启动目录下,也不行!最后放在python.exe目录下,成了!

requests

  • 毫无疑问这是最常用的爬虫库了,极大简化了操作,一切动力都来自于根植在 requests 内部的 urllib3,来个小demo:

    1
    2
    3
    4
    5
    6
    7
    8
    9
    import requests

    print(dir(requests)) # 查看包含的方法

    url = 'http://www.baidu.com'
    r = requests.get(url)
    print(r.text)
    print(r.status_code)
    print(r.encoding)
  • 传递参数

    1
    2
    3
    params = {'k1':'v1', 'k2':'v2'}
    r = requests.get('http://httpbin.org/get', params)
    print(r.url) # http://httpbin.org/get?k1=v1&k2=v2
  • 二进制数

    1
    2
    3
    4
    5
    6
    # 下载图片并保存
    from PIL import Image
    from io import BytesIO
    r = requests.get('http://i-2.shouji56.com/2015/2/11/23dab5c5-336d-4686-9713-ec44d21958e3.jpg')
    image = Image.open(BytesIO(r.content))
    image.save('download/meinv.jpg')
  • json处理

    1
    2
    3
    r = requests.get('https://github.com/timeline.json')
    print(type(r.json))
    print(r.text) # 返回字符串
  • 原始数据

    1
    2
    3
    4
    r = requests.get('http://i-2.shouji56.com/2015/2/11/23dab5c5-336d-4686-9713-ec44d21958e3.jpg', stream = True)
    with open('download/meinv2.jpg', 'wb+') as f:
    for chunk in r.iter_content(1024): # 将二进制数据分批写入
    f.write(chunk)
  • 处理表单

    1
    2
    3
    4
    5
    6
    import json
    form = {'username':'user', 'password':'pass'}
    r = requests.post('http://httpbin.org/post', data = form) # 信息保存在form
    print(r.text)
    r = requests.post('http://httpbin.org/post', data = json.dumps(form)) # 信息保存在json
    print(r.text)
  • cookie

    1
    2
    3
    4
    5
    6
    7
    8
    9
    10
    11
    12
    # HTTP协议本身是无状态的。什么是无状态呢,即服务器无法判断用户身份。Cookie实际上是一小段的文本信息(key-value格式)。客户端向服务器发起请求,如果服务器需要记录该用户状态,就使用response向客户端浏览器颁发一个Cookie。客户端浏览器会把Cookie保存起来。当浏览器再请求该网站时,浏览器把请求的网址连同该Cookie一同提交给服务器。服务器检查该Cookie,以此来辨认用户状态

    url = 'http://www.baidu.com'
    r = requests.get(url)
    cookies = r.cookies
    for k, v in cookies.get_dict().items():
    print(k, v) # BDORZ 27315

    # 访问网站可以带上我们的cookie,可以不再重新登录
    cookies = {'c1':'v1', 'c2': 'v2'}
    r = requests.get('http://httpbin.org/cookies', cookies = cookies)
    print(r.text) # 这是一个测试http请求的网站
  • 重定向

    1
    2
    3
    4
    5
    # 有些网站会跳转,可以查看记录
    r = requests.head('http://github.com', allow_redirects = True)
    print(r.url) # https://github.com/
    print(r.status_code)
    print(r.history) # 查看重定向历史

实例——爬取豆瓣信息

1
2
3
4
5
6
7
8
import requests

headers = {'User-Agent': 'Mozilla/5.0 (Windows NT 6.3; WOW64) AppleWebKit/537.36 (KHTML, like Gecko) Chrome/44.0.2403.157 Safari/537.36'}
cookies = {'cookie': 'KADUSERCOOKIE=3DB9575C-6B2B-4264-9050-ADA70EE038F8; KRTBCOOKIE_218=4056-XktWHAAAAwI6Oqx_&KRTB&22922-XktWHAAAAwI6Oqx_&KRTB&22978-XktWHAAAAwI6Oqx_&KRTB&23194-XktWHAAAAwI6Oqx_; PugT=1583546177; PUBMDCID=4'}
url = 'http://www.douban.com'
r = requests.get(url, cookies = cookies, headers = headers)
with open('download/douban_2.txt', 'wb+') as f:
f.write(r.content)
  • 上面是使用登录后的cookie爬取页面信息,cookie可以在浏览器的开发者工具Network中找到
  • 也可以使用用户名密码登录,但是可能需要输入验证码,比较繁琐
1
2
3
4
5
6
7
8
9
10
11
12
13
14
15
16
17
18
19
20
21
22
23
24
25
26
27
28
29
30
31
32
33
import requests
import html5lib
import re
from bs4 import BeautifulSoup

s = requests.Session()
url_login = 'https://accounts.douban.com/passport/login' # 豆瓣登录页面

formdata = {
'redir':'https://www.douban.com',
'form_email': 'szsplyr@163.com',
'form_password': '******',# 输入你的密码
'login': u'登陆'
}
# 请求头信息
headers = {'user-agent': 'Mozilla/5.0 (Windows NT 6.3; WOW64) AppleWebKit/537.36 (KHTML, like Gecko) Chrome/44.0.2403.157 Safari/537.36'}
# 提交表单信息
r = s.post(url_login, data = formdata, headers = headers)
content = r.text # 使用request抓取信息
soup = BeautifulSoup(content, 'html5lib') # 使用bs4解析信息
captcha = soup.find('img', id = 'captcha_image')
if captcha: # 如果有验证码
captcha_url = captcha['src']
re_captcha_id = r'<input type="hidden" name="captcha-id" value="(.*?)"/'
captcha_id = re.findall(re_captcha_id, content)
print(captcha_id)
print(captcha_url)
captcha_text = input('Please input the captcha:')
formdata['captcha-solution'] = captcha_text
formdata['captcha-id'] = captcha_id
r = s.post(url_login, data = formdata, headers = headers)
with open('download/contacts.txt', 'w+', encoding = 'utf-8') as f:
f.write(r.text)

Scrapy

  • 对于简易的项目可以使用上面的方式结合数据解析爬取,但是从数据的请求到存储是一个比较复杂的过程,如果项目需求较大,一步步操作效率很低,所以推荐使用scrapy爬虫框架

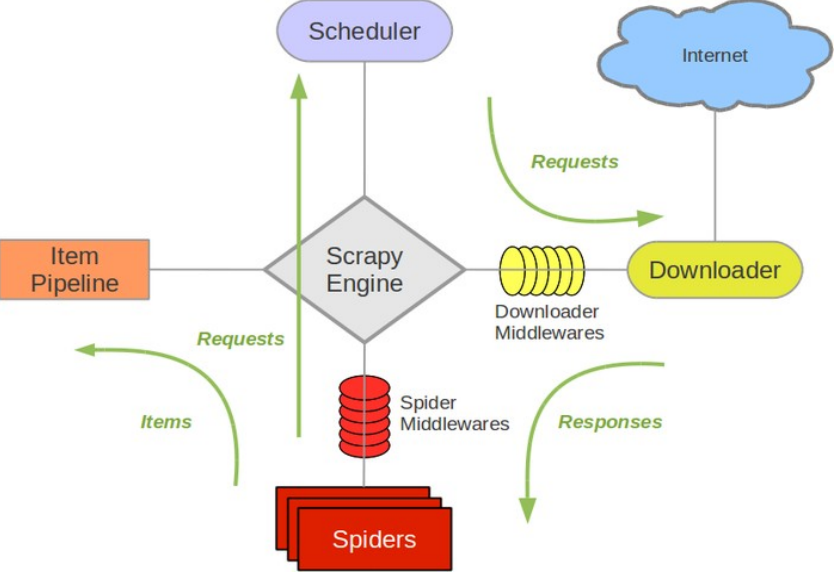
  • 框架的整个流程如图所示:官网链接

  • 主要结构包括

    1. 引擎(Scrapy Engine) 【心脏】

    负责Spider、ItemPipeline、Downloader、Scheduler中间的通讯,信号、数据传递等

    1. 调度器(Scheduler) 【脑袋】

    负责接受引擎发送过来的Request请求,并按照一定的方式进行整理排列,入队,当引擎需要时,交还给引擎。

    1. 下载器(Downloader)

    负责下载Scrapy Engine(引擎)发送的所有Requests请求,并将其获取到的Responses交还给Scrapy Engine(引擎),由引擎交给Spider来处理

    1. 蜘蛛(Spiders) 【胃…】

    负责处理所有Responses,使用xpath解析页面内容,并将需要跟进的URL提交给引擎,再次进入Scheduler(调度器),并生成解析后的结果Item。

    最后返回的这些Item通常会被持久化到数据库中(使用Item Pipeline)或者使用Feed exports将其保存到文件中。

    1. 项目管道(Item Pipeline)

    负责处理Spider中获取到的Item,并进行进行后期处理(详细分析、过滤、存储等)的地方

    1. 下载器中间件(Downloader Middlewares

    可以自定义扩展下载功能的组件

    1. 蜘蛛中间件(Spider Middlewares)

    可以自定义扩展的功能组件比如进入Spider的Responses;和从Spider出去的Requests

    1. 调度中间件(Scheduler Middlewares)
  • 使用scrapy爬取单个页面:

1
2
3
4
5
6
7
8
9
10
11
12
13
14
15
16
import scrapy

class houseSpider(scrapy.Spider):
name = "House"
start_urls = ['https://hangzhou.anjuke.com/sale/']
# 同样,使用开发者工具中的Copy xpath得到节点信息传递给xpath解析
def parse(self,response): # 爬虫获取到的信息
for houseInfo in response.xpath('//*[@id="houselist-mod-new"]/li/'):
print(houseInfo.xpath('div[2]/div[1]/a/text()').extract_first())
print(houseInfo.xpath('div[2]/div[2]/span[1]/text()' + 'div[2]/div[2]/span[2]/text()' + 'div[2]/div[2]/span[3]/text()' + 'div[2]/div[2]/span[4]/text()').extract_first())
print(houseInfo.xpath('div[2]/div[3]/span/text()').extract_first()) # text()表示提取文本
yield { # 生成器,可迭代
'title': houseInfo.xpath('div[2]/div[1]/a/text()').extract_first(),
'desc': houseInfo.xpath('div[2]/div[2]/span[1]/text()'+ 'div[2]/div[2]/span[2]/text()' + 'div[2]/div[2]/span[3]/text()'+ 'div[2]/div[2]/span[4]/text()').extract_first(),
'path': houseInfo.xpath('div[2]/div[3]/span/text()').extract_first()
} # 可以用不同的格式将返回的字典信息保存
  • 在pycharm的terminal中使用命令:scrapy runspider scrapyDemo.py -o houseInfo.csv
  • 爬取上面的页面你会发现怎么都得不到数据,原因是:

感受到了对小白满满的恶意!没事,先投降,以后再搞他 ……

注:在获取xpath表达式的时候一定要用分块分割的思想,获取内容时要展开到最底层使用对应的方法,熟悉常见的xpath表达式符号的意义:// / @ [表达式] text() position() last()

  • 使用scrapy爬取多张页面:
1
2
3
4
5
6
7
8
9
10
11
12
13
14
15
16
17
18
19
20
21
22
class tagSpider(scrapy.Spider):
name = 'Tag'
start_urls = ['http://quotes.toscrape.com/tag/humor/']

def parse(self,response): # 爬虫获取到的信息
for tagInfo in response.xpath('/html/body/div/div[2]/div[1]/div'):
print(tagInfo.xpath('span[1]/text()').extract_first())
print(tagInfo.xpath('span[2]/small/text()').extract_first())
print(tagInfo.xpath('div/a[1]/text()').extract_first())
yield {
'Info': tagInfo.xpath('span[1]/text()').extract_first(),
'author': tagInfo.xpath('span[2]/small/text()').extract_first(),
'tag': tagInfo.xpath('div/a[1]/text()').extract_first()
} # 可以用不同的格式将返回的字典信息保存

# 获取下一页路径信息,回调解析
# previous节点的xpath:/html/body/div/div[2]/div[1]/nav/ul/li/a
# 所以我们最好使用css选择器作为属性建立表达式: //li[@class="next"]/a/@href
next_page = response.xpath('//li[@class="next"]/a/@href').extract_first()
if next_page is not None:
next_page = response.urljoin(next_page) # 将下一页信息继续给parse解析
yield scrapy.Request(next_page, callback=self.parse) # 回调函数(不使用括号),前面的即是参数

scrapy创建项目

  • 推荐使用scrapy创建项目再爬取数据

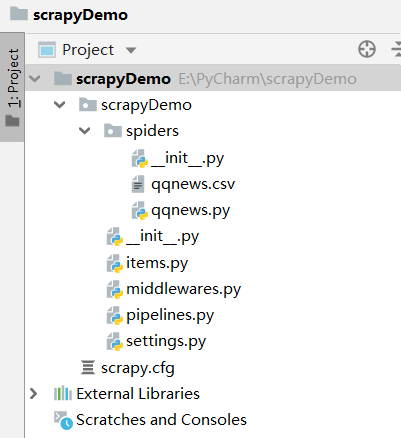
  • 在合适的目录下,命令行:scrapy startproject ProjectName 创建,目录结构:

  • 以下框架介绍可以先整体阅读一遍再实操,是一个整体

  • 在spiders下面创建代码:

1
2
3
4
5
6
7
8
9
10
11
12
13
14
15
16
17
18
19
20
import scrapy
from scrapyDemo.items import ScrapydemoItem

class Qnews(scrapy.Spider): # 注:代码结果有些问题,看一下流程即可
name = "QQnews"
start_urls = ['https://new.qq.com/ch/antip/'] # 主页面(默认url)
# response代表的是一个页面的信息,而非一个路径
def parse(self, response):
for url in response.xpath('//*[@id="List"]/div/ul[2]/li/div/h3/a/@href'):# 所有新闻链接
# Request对象会传递路径给下载器得到页面
newsPage_url = response.urljoin(url.extract_first())# extract_first()返回的是一个string,是extract()结果中第一个值
yield scrapy.Request(newsPage_url, callback=self.parseNews) # 回调解析

def parseNews(self, response):
items = ScrapydemoItem() # 实例化数据存储字段类
print(response.xpath('/html/body/div[3]/div[1]/h1/text()').extract()[0]) # extract()返回的所有数据,存在一个list里
# yield {'title': response.xpath('/html/body/div[3]/div[1]/h1/text()').extract()[0]}
items['title'] = response.xpath('/html/body/div[3]/div[1]/h1/text()').extract()[0]
items['text'] = response.xpath('/html/body/div[3]/div[1]/h1/text()').extract()[0]
items['source'] = response.xpath('/html/body/div[3]/div[1]/h1/text()').extract()[0] # 填充数据字段

从主页面获取多个新闻页面链接,回调给具体的新闻解析方法parseNews()

我们可以使用scrapy自带的调试工具,查看页面是否能爬取成功:

  • 在终端使用命令:scrapy shell http://爬取的网址,可以执行xpath方法

  • 除了spider之外,框架还提供了其他类型的爬虫
    1. CSVFeedSpider
    2. CrawlSpider
    3. XMLFeedSpider
  • ProjectName/items.py下定义数据字段:
1
2
3
4
5
6
7
8
9
10
11
import scrapy

class ScrapydemoItem(scrapy.Item): # 定义数据的存储字段,在spiders中引用
# define the fields for your item here like:
# name = scrapy.Field()
title = scrapy.Field() # 新闻标题
text = scrapy.Field() # 新闻内容
source = scrapy.Field() #新闻来源

class ScrapydemoItem2(scrapy.Item): # 定义新的数据的存储字段
pass

可以使用ItemLoader填充:

  • 获取数据字段Item之后,被发送给Item Pipeline,然后多个组件按照其中定义的方法顺序处理这个item
  • 经常会实现以下的方法:
1
2
3
4
5
6
7
8
9
10
11
12
13
14
15
16
import json
from scrapy.exceptions import DropItem
class SpiderPipeline(object):
def __init__(self):
self.file = open('xxx.json','w')

def close_spider(self):# 爬虫关闭时执行
self.file.close()

def process_item(self,item,spider): # 爬虫执行过程中执行
if item['title']:
line = json.dumps(dict(item)) + "\n"
self.file.write(line)
return item
else:
raise DropItem("没有找到标题"+title)

Item Pipeline还提供了一些可以重用的Pipeline,其中有filesPipelineimagesPipeline,用于图片和文件下载

以上即是scrapy项目使用的大致流程,如果想详细了解提到的组件,可以参考链接,并结合官网内容,因为有些东西更新了,比如extract()方法变为getall(),extract_first()方法变为get()

接下来以项目为主介绍详细的使用方法!

实例——爬取豆瓣图书信息

  • 查看项目
  • 接下来就是爬虫的最后一环——数据存储
  • 这里对爬虫知识点进行对比总结

晚安!

------ ���Ľ���------